My rear brake set-up
911 rear brakes on a 914
Up-dated; November 25, 2008
This is page is not yet complete!
To start off;
I've got to say thanks to Erik Shea and also Larry Hubby for being willing to give out information and answering questions.
I'm going to break this down into "parts" and at a latter date will add hyperlinks to the different sections.
There are three reasons for doing this conversion. You step up to 38mm calipers (from 32mm), you get vented rotors, and you also get five lug hubs.
Part 1, mounting the 911 parking brake assembly;
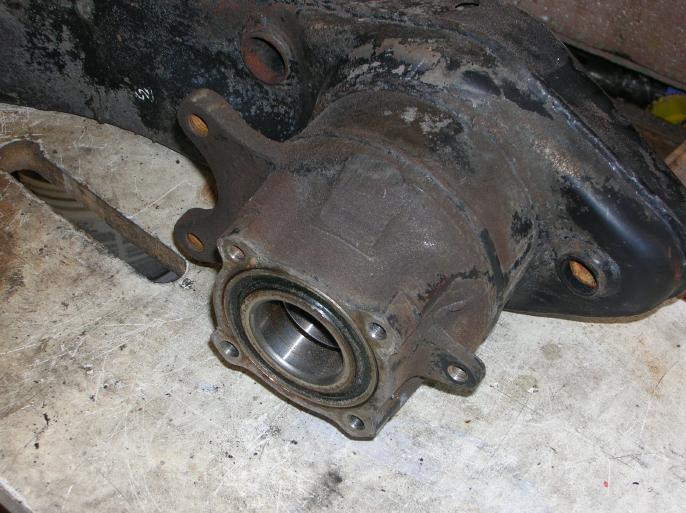
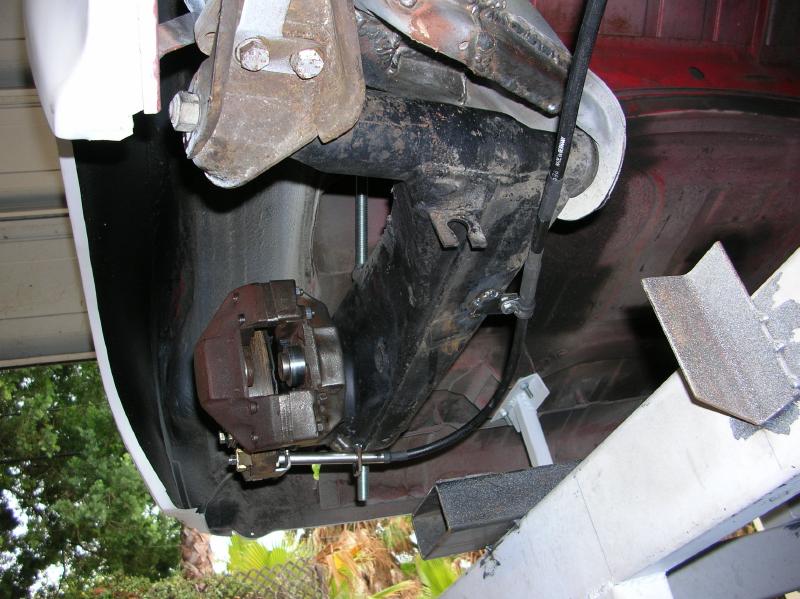
You have to start with the backing plate and parking brakes from an early 911. You want the ones from a 911 that had steel trailing arms, not aluminum. The reason is that when they went to the aluminum arms, they also went to a larger bearing, resulting in the bolt spacing being further apart. The ones from the steel trailing arms will bolt up after grinding clearance on the 914 arms.
Here are before and after photos showing the grinding needed.
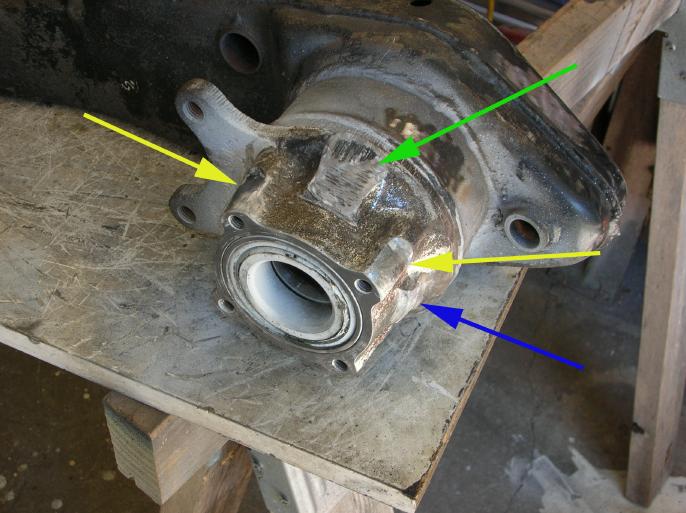
First off, the photos show the arms up-side down, so don't let that bug you.
The green arrow shows what is casting flash and it needs to be ground down slightly. Some of this was to clear the backing plate, but most was to provide a clear shot for the parking brake cable. It will make more sense as you read further down and look at photos.
The blue arrow shows where there was a bolt hole for the original 914 backing plate. It's not needed and is in the way.
The yellow arrow show where additional clearance needs to be provided for the backing plate. This also occurs on the under side, not shown in the photo.
In order to figure out how much (and where) to grind, I sprayed the hub with (white) paint and tried to install the backing plate. As you move the backing plate around, it wipes off the paint where grinding is needed. It's time consuming, but in insures that you only grind away what is required.
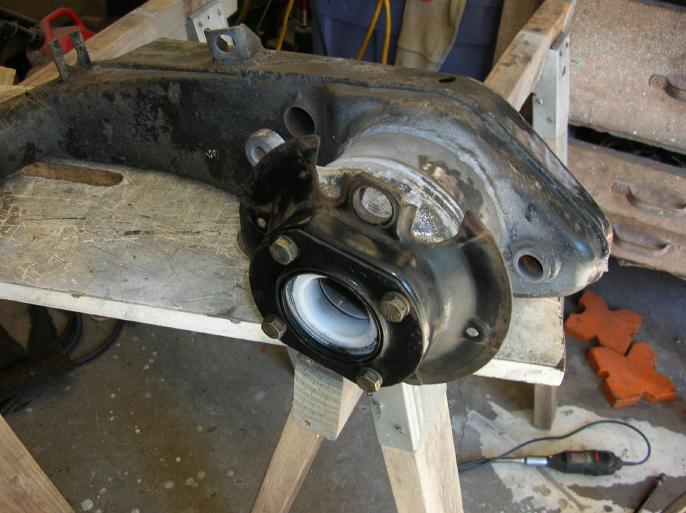
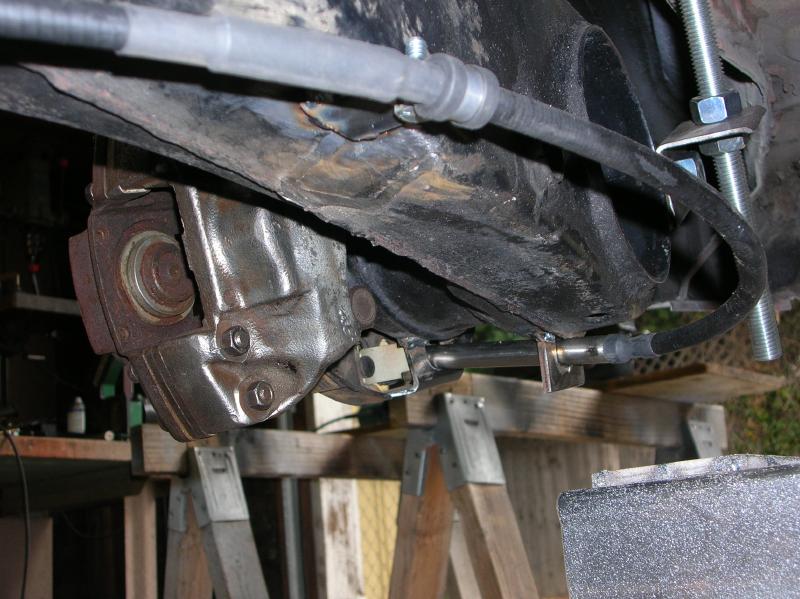
Here is a photo of the backing plate installed (once again, the arm is up-side down from what it would be once installed in the car).
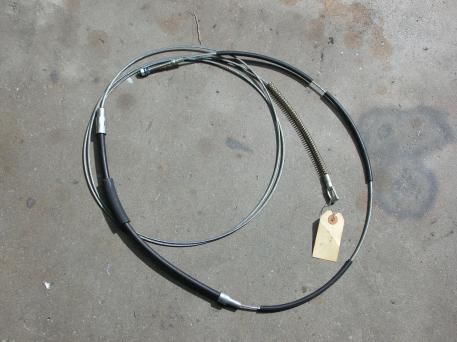
Part 2, making up hybrid parking brake cables;
At the time of this writing, I've only got the drivers side cable made up. I did it first due to it requiring additional problems to be addressed. The passenger side is just that much easier.
There are several ways that people have hooked up the cables to the 911 parking brake assembly, but in most cases they do it in a method that is similar to what the factory did. I'm not going to bad-rag what works for others. I just thought that there must be a better way.
In the 911, the cable and sheathing do two things at what is called the "spreader bars", within the parking brake assembly. The inner cable pulls on one of the spreaders while the "sheathing" pushes on the other spreader.
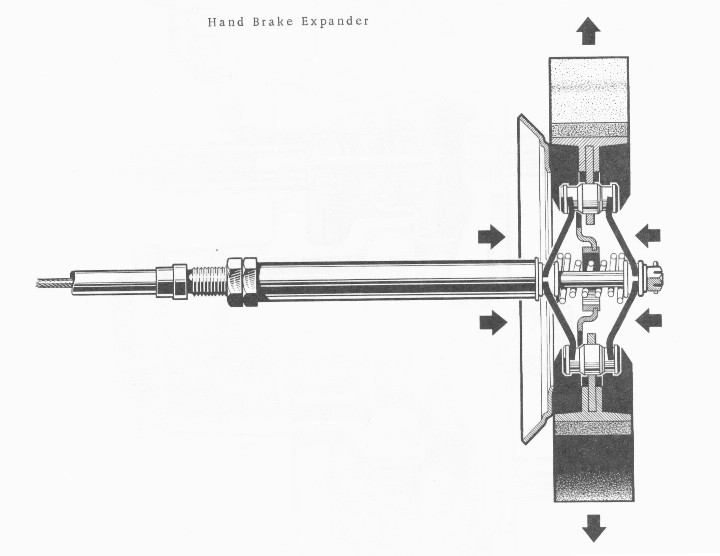
I wanted to have my installation to work in the same way. (the installation done by Larry Hubby does this)
The complications are two fold. The 914 cable isn't long enough, plus the "crimped on" cable end isn't correct for this type of attachment.
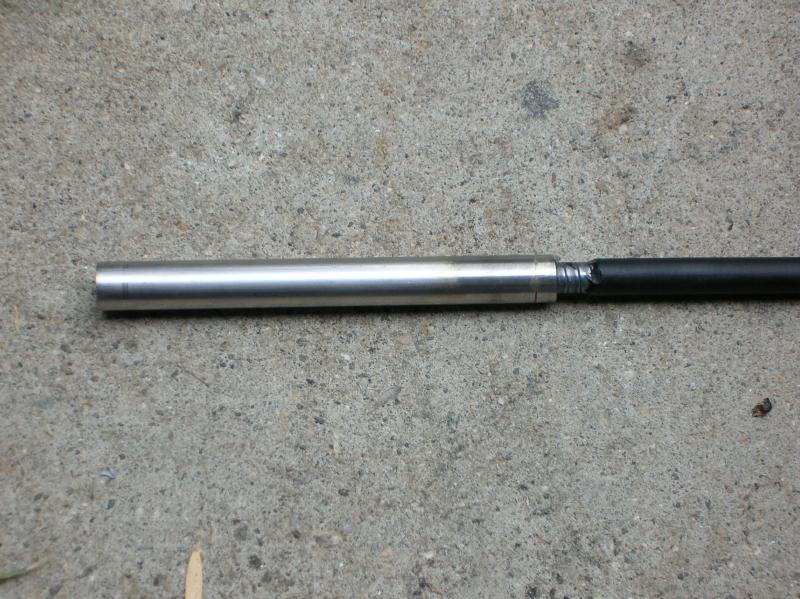
I normally don't show "finished" photos at the top of a page, but it's worth while in this case in order to keep you reading.
The cable sheathing is now about 18" longer and the inner cable goes full length (and extends almost three feet into the passenger compartment). The end fitting on the end of the inner cable is correct for this installation (similar to the 911 cable end) and is crimped on at the factory.
The only "special" parts that require machine work are the "end fittings" (one required per side) and a "splice".
Here are the dimensioned drawings;
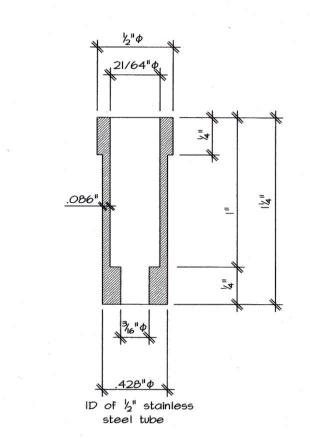
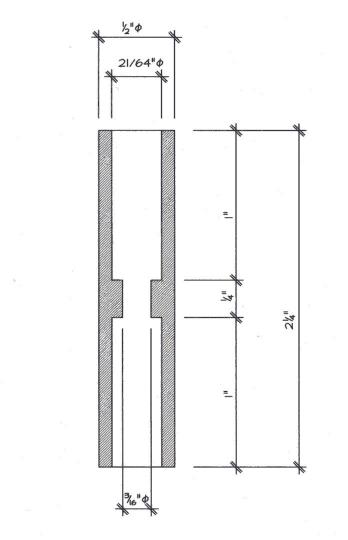
On the left is what I'm calling the "end fitting". On the right is the "splice". I made them out of stainless steel. No special source for steel. I just went to a boat supply shop and bought a long 1/2" diameter bolt (for about $7.50). I was able to make all of the three required parts from a single bolt.
The reason for the 21/64" diameter hole is that the Gemo 914 parking brake cables have this diameter after removing the black outer covering. Gemo is the standard replacement manufacturer for parking brake cables. I'm not sure if the factory cable's sheathing is the same!!
The .428" diameter hole matches the inner diameter of 1/2" stainless steel tube. (I'd recommend that you print out the two drawings cause it may help make it more clear latter)
The 3/16" diameter hole is to allow the inner cable to pass through. (the cable is a metric size that is slightly smaller than 1/8")
You will need two 4 1/2" long lengths of 1/2" stainless steel tube. (one per side)
You will need an additional driver-side standard 914 parking brake cable assembly (for it's outer sheathing).
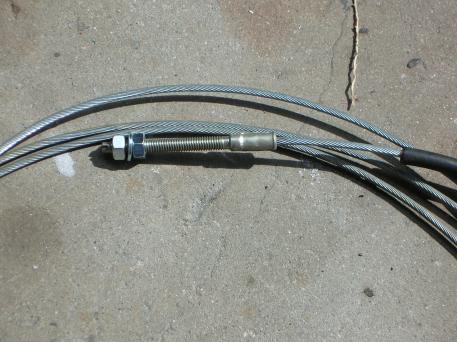
Now here is the funny thing that you will need, and what makes this all possible. You are going to need two (one per side) parking brake cable assemblies for a 1970/71 VW bus. Now if you are used to paying for "Porsche" parts, you are in for a surprise. I was able to get one for only $14.00 at a local "air cooled VW" shop. They had 6 in stock. (you will also need two m6 castle nuts, which Porsche lists for $18.00 each) The factory part number is 211 609 701 PBR. All you are going to use is the inner cable and it's brake end. (the cable is something like 13 feet long!!)
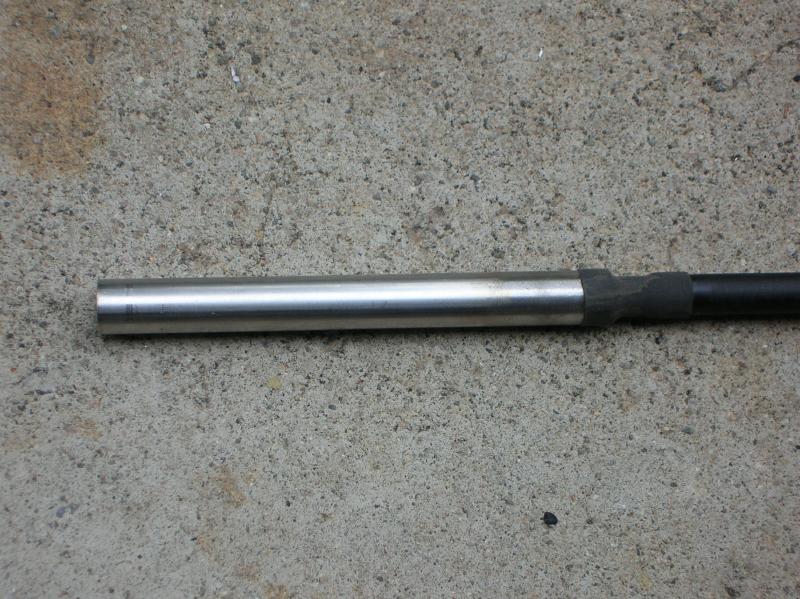
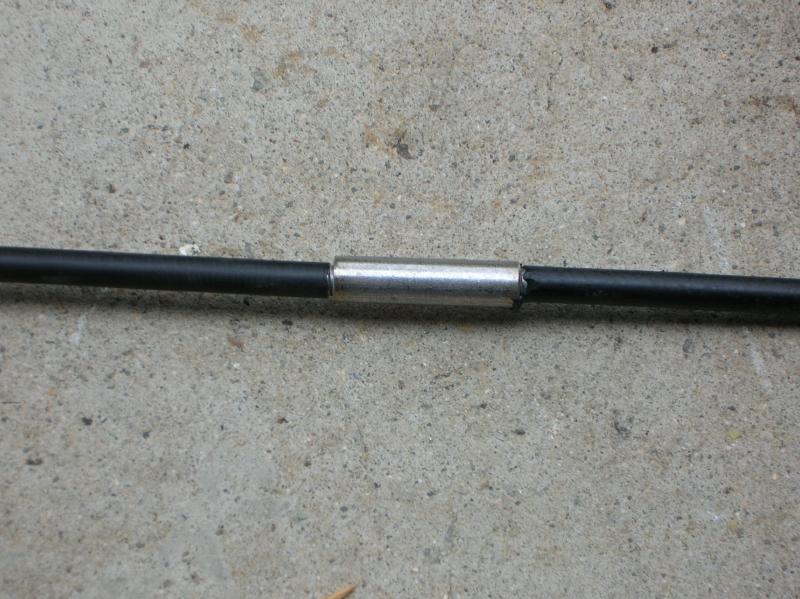
Here is how the sheathing "end" is built.
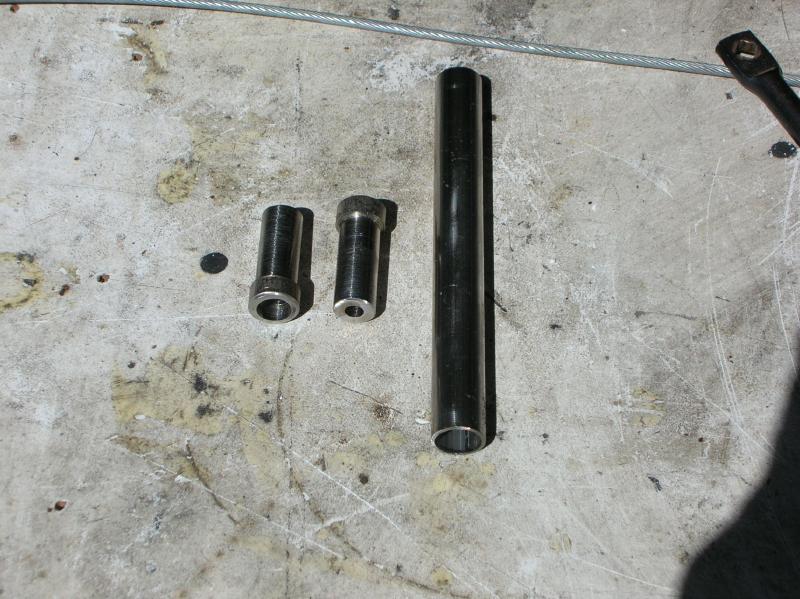
This photo shows the 4 1/2" long 1/2" stainless steel tube and also two of the "end fittings". The end fitting is inserted into the tube and then silver soldered (or brazed) in place.
Then you take the drivers side parking brake sheathing (ya, we are working on the unit that will end up on the drivers side), remove the cable after cutting off one of the ends, and then cut off the fitting that is crimped on the end of the sheathing. Cut off 1" of the black outer cover and insert it into the "end fitting" assembly. (it can only go in 1" due to the depth of the 21/64" diameter hole!!!!)
Then you can cover it all up with heat shrink tubing.
Now (after cutting off the end fittings) put the original drivers side sheathing in place and also the modified (what was drivers side) sheathing. Hold it in place by what ever method works for you. I used a bunch of tie-wraps as shown.
Mark the modified sheathing and cut it as required. Cut back 1" of the black sheathing cover.
Here is a photo showing the two sections of sheathing and also the stainless steel "splice" section.
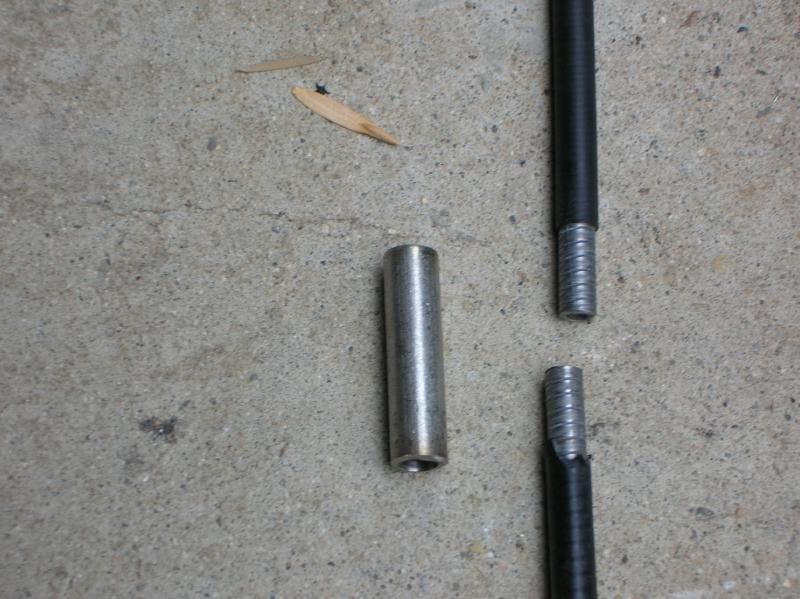
Both sections get inserted into the splice piece 1". They "dead-head" against the center section where there is the 3/16" hole.
I may be a good idea to use JB Weld to help hold the pieces together. You can then use heat shrink tubing to cover it.
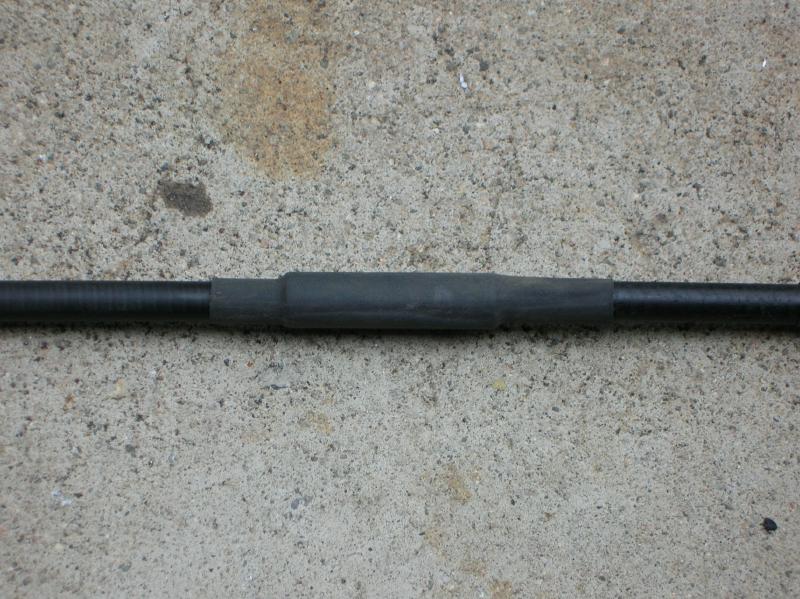
You can now grease up the WV cable and insert it.
In order to build up the cable assembly that will be on the drivers side, just start with an original passenger side sheathing. All you have to do is cut it to the required length and insert the end fitting. Then insert the new VW cable after greasing.
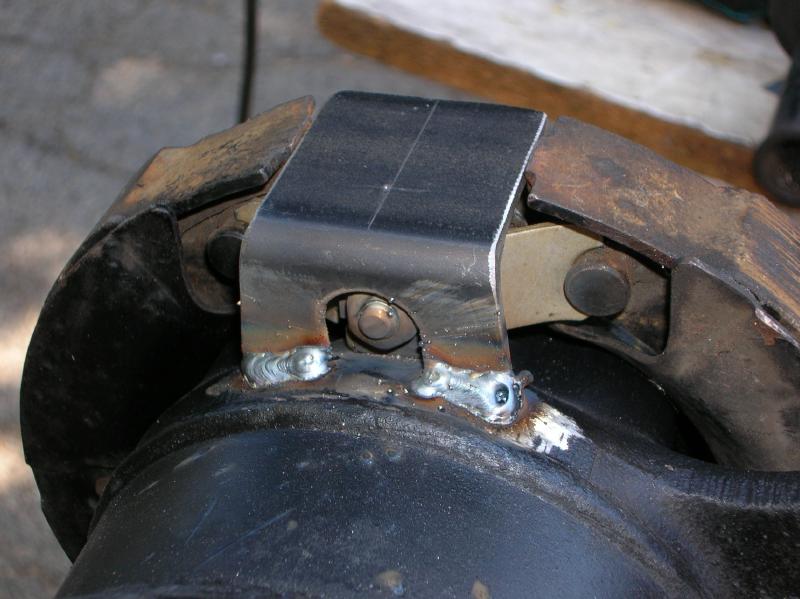
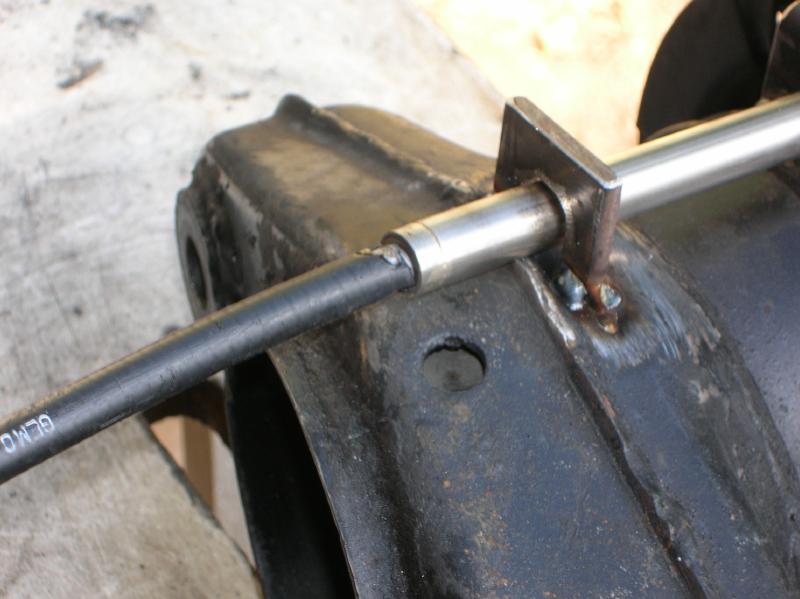
Part 3, The brackets and what they do;
There has to be a 40mm wide bracket that goes between the brake shoes. This does two things. One is that it keeps the shoes apart when the parking brake is released. The other is that when the parking is applied, it keeps the shoes from rotating around.
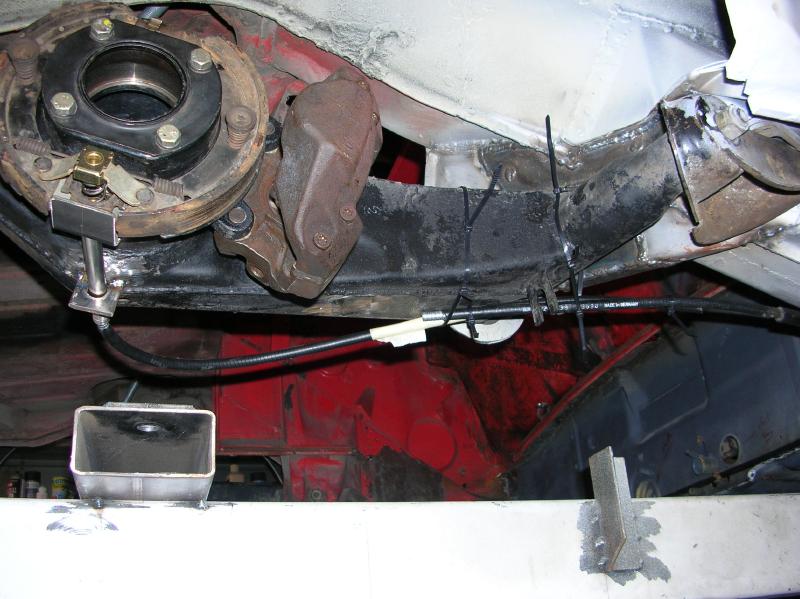
On the 911, this bracket is part of the trailing arm assembly. The following photo shows it (yellow arrow) on an original 911 arm. Although maybe not clear in the photo, that piece is a solid piece of the trailing arm and not part of the removable parking brake backing plate!!
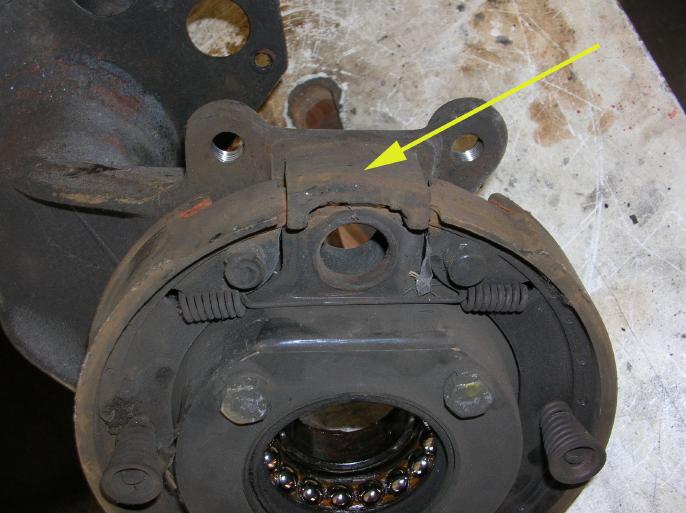
There has to be an opening in the bracket so that the parking brake cable can pass through it. The parking brake cable and it's sheathing are not attached to this bracket!
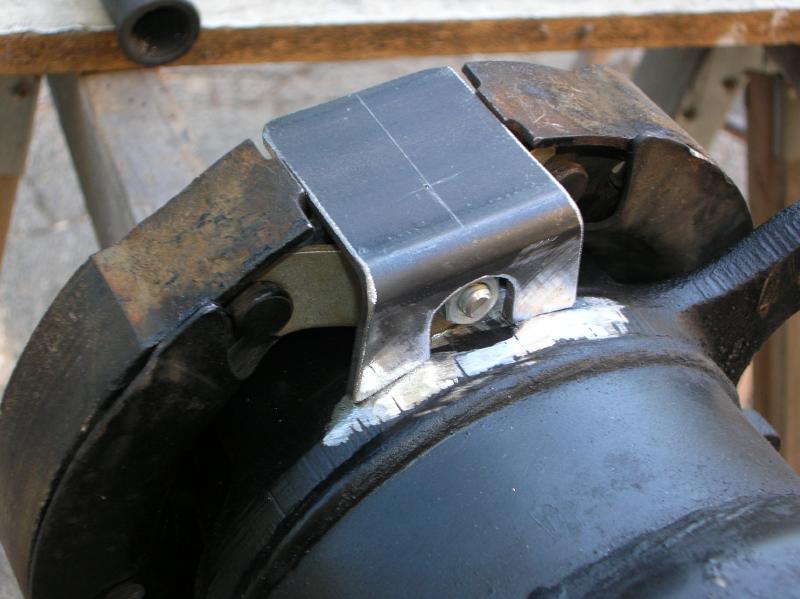
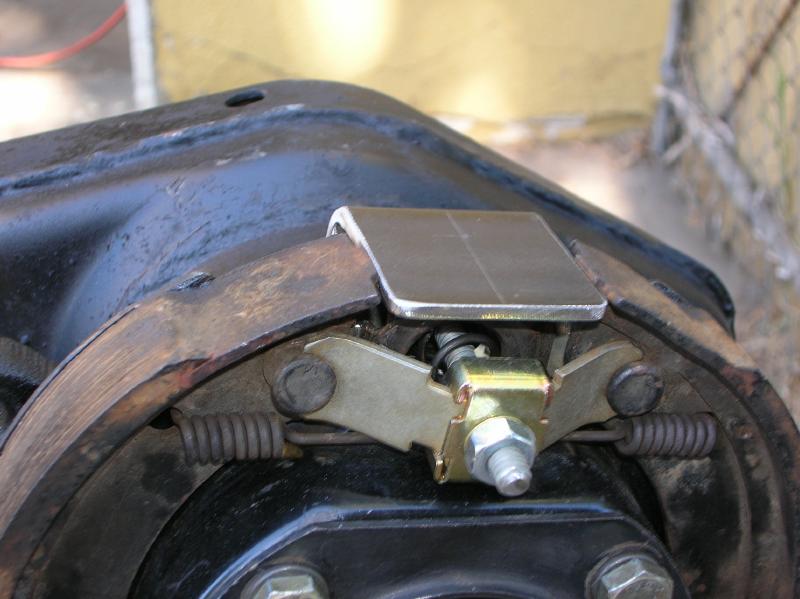
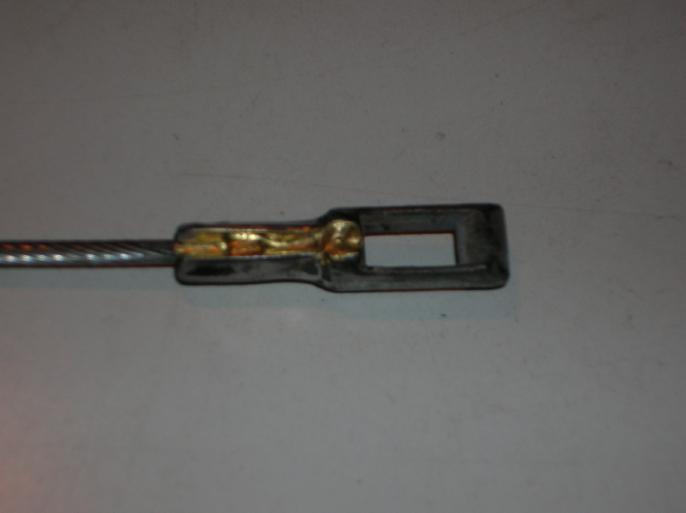
In these photos, I've got a piece of threaded rod holding the spreaders apart. It's taking the place of the parking brake cable end fitting.
Here is a view from the other side.
The next bracket is intended to limit lateral movement of the cable sheathing piece. I did this due to how the cable would want to force it off to the side.
This bracket does not prevent any "in and out" movement of the end piece!
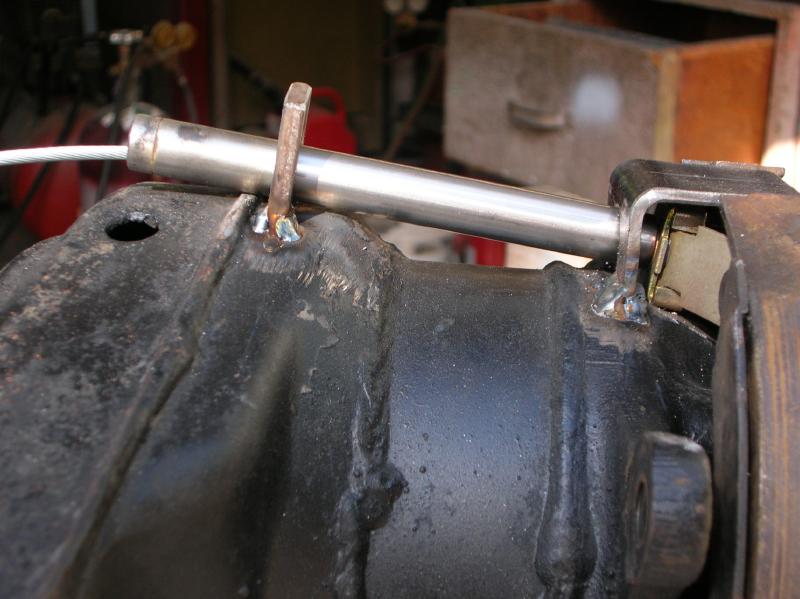
You can see how the "end piece" rests directly on the (gold colored) "spreader". This is how the cable sheathing pushes on the spreader, while the cable pulls on the spreader on the other side.
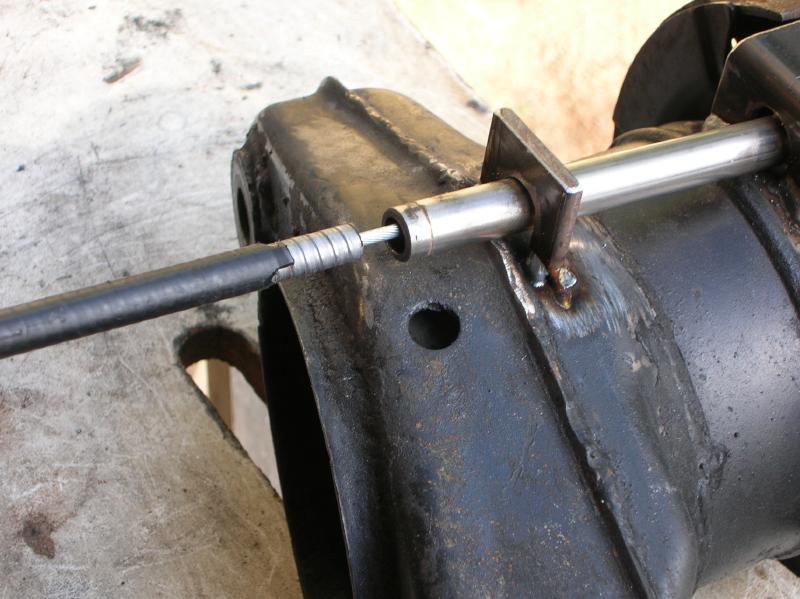
In the photo on the left, the sheathing hasn't been inserted into the end piece yet.
On the right, the sheathing is inserted 1" into the end piece (bottoming out on the shoulder inside).
Part 4, modifying the cable ends at the parking brake lever;
At the end of the VW bus cable that goes through the firewall, you have to cut it short and put on a "lug".
You want to start with an old cable and cut off it's lug. I did this by using my trusty 4" Mikita grinder with cut-off wheel. A cut is made on both sides of the lug. At that point, you can pull out the old cable end.
The cut is then opened out to a "V" cut.
At that point, it's possible to insert the new cable end and braze or silver solder it together using a small tip on an oxy/acetylene torch.
In this photo, I did a test brazing.
And in the next, I did it with silver solder.

(sorry about the photos being not focused too well)
There are two things that you have to do in order for this to work out well.
The first is that you want to clamp the cable in a vice, close to the lug, in order to work as a heat sink. This will keep the brazing or silver solder from flowing up the cable.
The other is that you want to use the tip of the welder to heat up the cable first in order to get it to flow out well! If you don't do this, the brazing or solder just fills the upper cavity of the "V".
Both brazing and soldering work by capillary action. The added braze or solder only flows where the base material is hot enough to melt it!!
Things yet to do;
I've got to do the write-up showing how the 911 parking brake assembly is mounted.
I have to get another stock passenger side parking brake cable so that I can use it to make the drivers side hybrid cable.
I've got to pick up another VW bus cable.
I've got to drill a hole in the end of the crimped on cable end for a cotter pin. The stock 911 has a castle nut with cotter pin, not double nuts.
So there you go.
return to my site's entry page
Wes Vann