Messing with a Honda Transmission
February 7, 2004
To start off;
I think that when a lot of us were young (a long time ago in my case), we thought that there were monsters under the bed or in the closet. When we got older, we figured out that it really isn't the case. However, it seems that a lot of people still think that there are monsters inside their transmission! That just not the case! There may be blown bearings and such, but no monsters. I hope to put an end to that by showing what I went through.
Most of the photos can be clicked to see a full screen version. Use your "back" button to return here.
This is not intended as a "how to" page!! I'm not an expert on what "interchanges", so please don't ask.
The photos shown are the result of my rebuilding a YS1 transmission that was originally out of 93 LS Acura. The plan is that it will be going into a 89 Civic, attached to the B18C that I have. At this time, I also added a Quaife LSD differential.
After talking to a bunch of individuals that seem to know Honda transmissions, the 92/93 YS1 was considered as the best option for what I was planning on doing. It's a "cable" transmission (it's going in a 89 Civic), you can still get repair parts from Honda, plus the gear sets out of the latter "hydro" transmissions will fit. (I believe this to be true, but I'd also not guarantee it!)
If you plan on working on a Honda Transmission, there are two things that you have to get! Simply put, if you don't think they are worth the money, then you shouldn't be taking a transmission apart.
You will need the factory manual for the year transmission you are working on. Order one through Helm and spend a good amount of time looking through it. Look, I'll make it real easy and give you a link to their web address; Helminc.
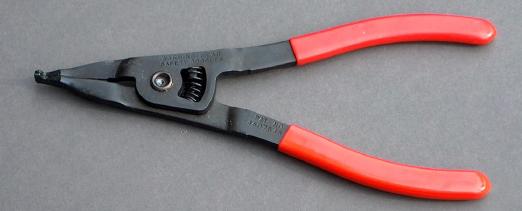
You will also need snap ring pliers that you can get from Sears, part number 47386. The Sears near me had them on the shelf.
There is nothing scary about rebuilding a manual transmission. I've done several different types and with a manual, it all makes sense. However, it's something that you can't rush.
Now here is a little true confession; If you read through this real close, you may note that I didn't follow the factory manual down to the letter. If you have never worked on a transmission, follow the book!
About that "does my transmission have an LSD" question;
The answer is that if you pull the axles out, on a non-LSD differential, you will see the spider gear cross-shaft. The photo below shows what I'm talking about. The second photo shows the differential outside of the transmission. Once again, this is an "open" differential and not an LSD.
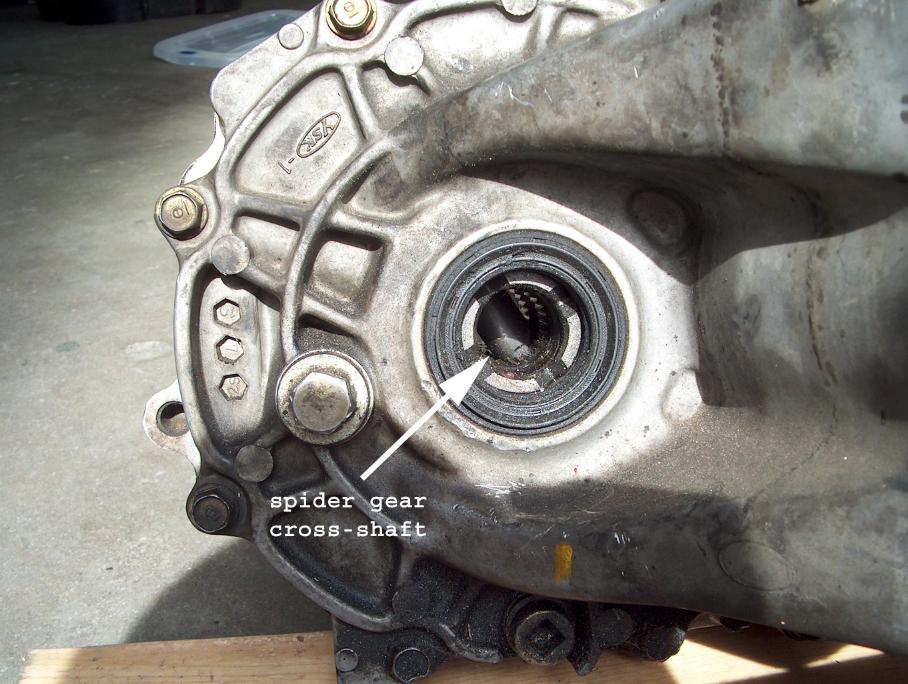
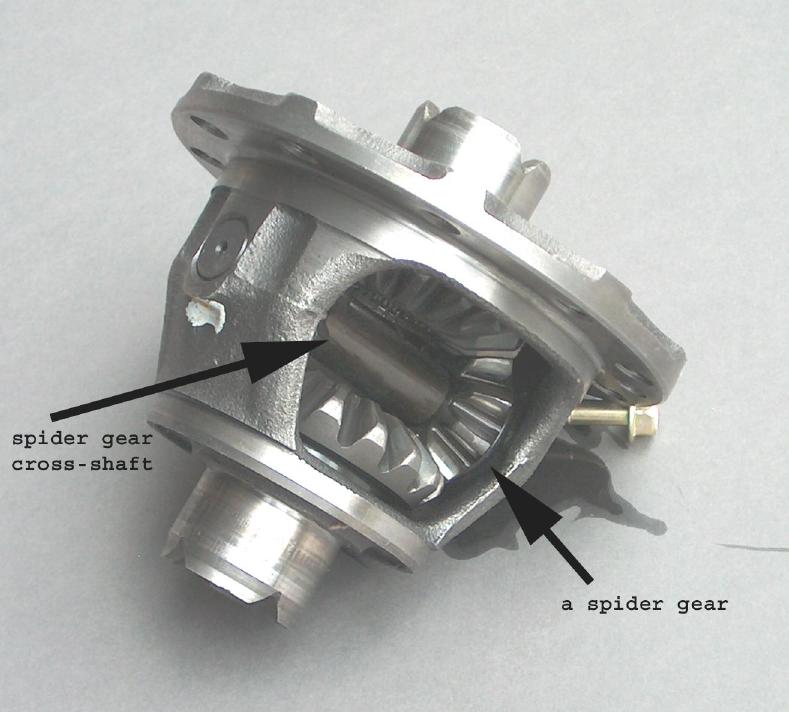
(that bolt shown in the photo on the right is just sitting there to hold the differential while I photographed it)
What about having to "shim" a new differential
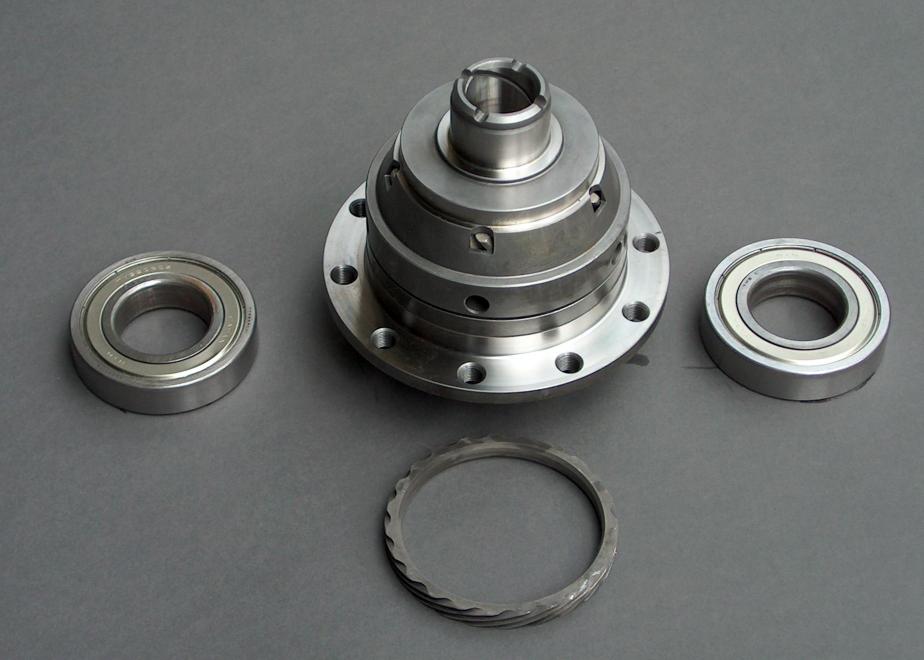
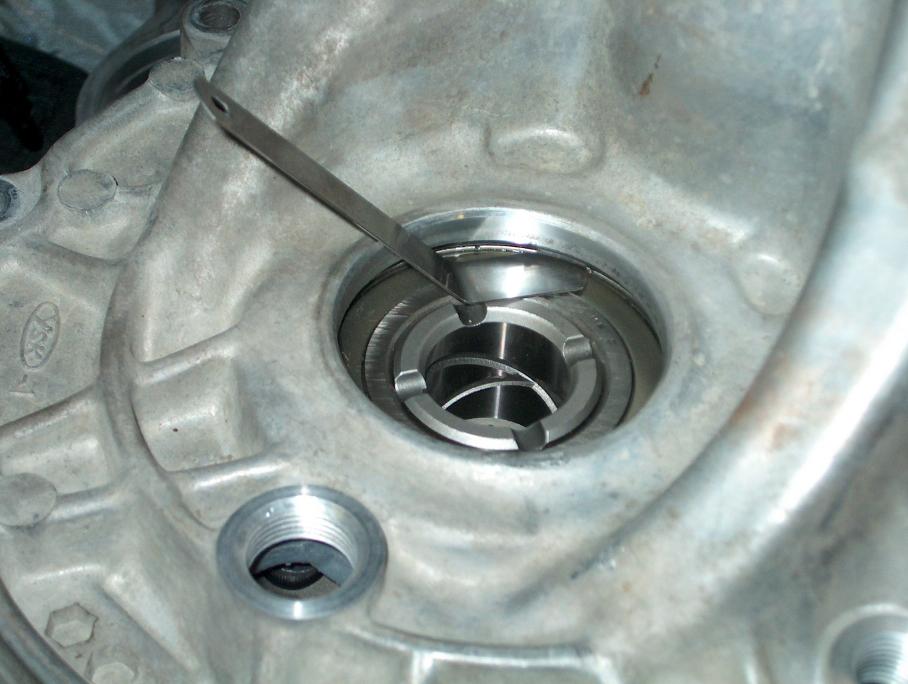
In the photo on the left, that's my new Quaife differential, the bearings (that I re-used), and the speedometer drive gear. (you need a press to remove and replace the bearings and speedometer drive gear)
When you install a new differential, you have to check the end play of the assembly once it's inside the case. What you do is, install the differential assembly, bolt the cases together, and then use a feeler gauge to check the clearance. This is shown in the photo on the right (I haven't installed the axle seal at this point). (note; it was pointed out to me that the factory manual says that the two cases should be torqued down while doing this check)
You get the "allowable" gap value out of the factory manual that you bought. If the end play isn't correct, you can get different thickness shims from Honda. The shim it's self is a snap ring and will not fall out of the case.
I didn't take a photo of the shim snap ring and if anybody has one and will let me use it, please let me know. There is a link to my e-mail address at the bottom of this page.
Now about taking apart the trans
In the next couple photos, I'll show what all those bolts are on the outside of the transmission. (keep in mind that the photos can be "clicked" to see a larger version!)
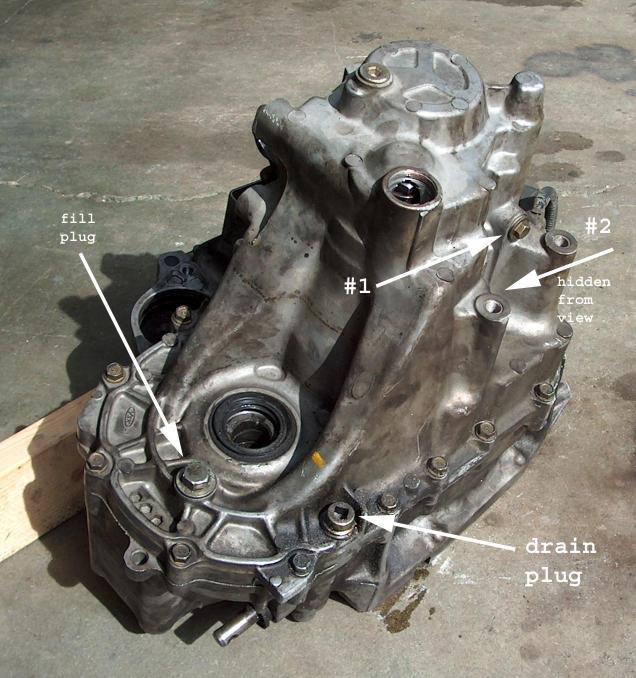
You can leave the "fill plug" and "drain plug" in place.
Arrows #1 and #2 are pointing to what are called "detent" ball cover bolts. Remove them. When you do, there will be a spring under the bolt and also what looks like a ball bearing ball. They don't jump out when the bolt is removed, but if you tilt the trans, they will come out freely. Both detent balls and springs are the same and you don't have to worry about mixing them up.
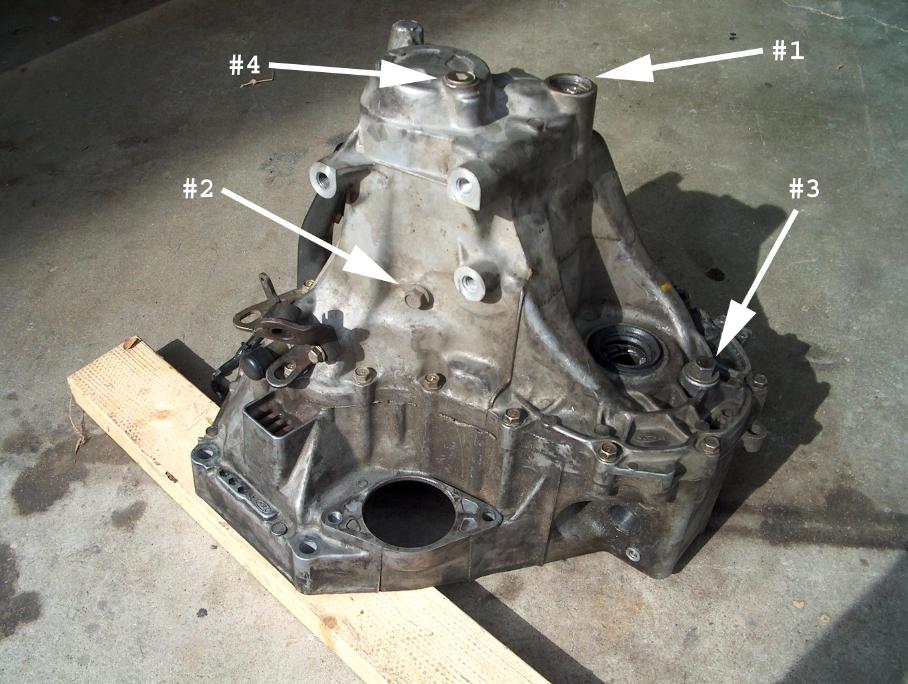
First off, there is a reason that the transmission is sitting on that piece of 2x4!! The input shaft (where the clutch disk goes) sticks slightly beyond the surface where the transmission bolts to the engine. As a result, if you just let it sit down on the floor, it would rest on the input shaft.
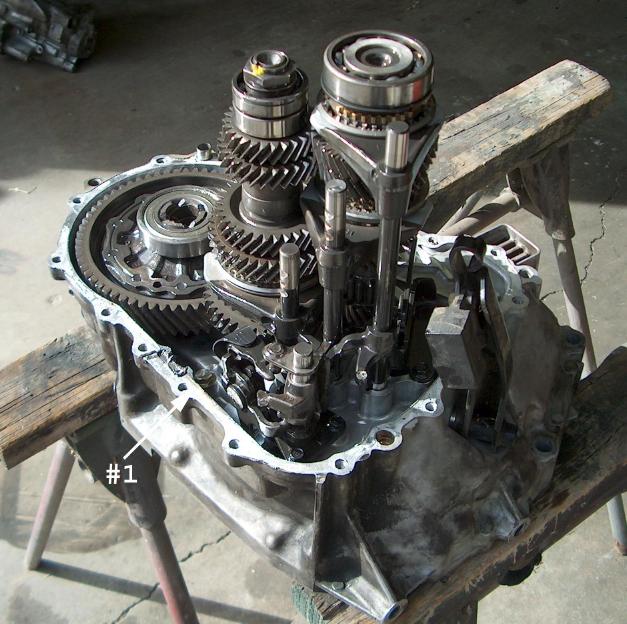
Arrow #1 points to the cover plate that you have to remove to get to the intermediate shaft snap ring. I'll talk about the snap ring latter.
Arrow #2 points to a bolt that keeps the reverse gear shaft from rotating. It's a special bolt that fits into a hole on the side of the shaft and there will be a photo latter showing what I'm talking about. Remove it.
Arrow #3 points to the oil fill plug. You don't have to touch it (except when totally done and you want to add fluid).
Arrow #4 points to a cover plate for the "oil spreader bar" or tray. Don't remove it.
Splitting the case
Remove the bolts that I talked about in the two prior photos. Remove the "reverse" light switch. I'd also recommend that you also remove the clutch lever (it's not really necessary, but it just gets into the way). Remove all the bolts around the perimeter of the case.
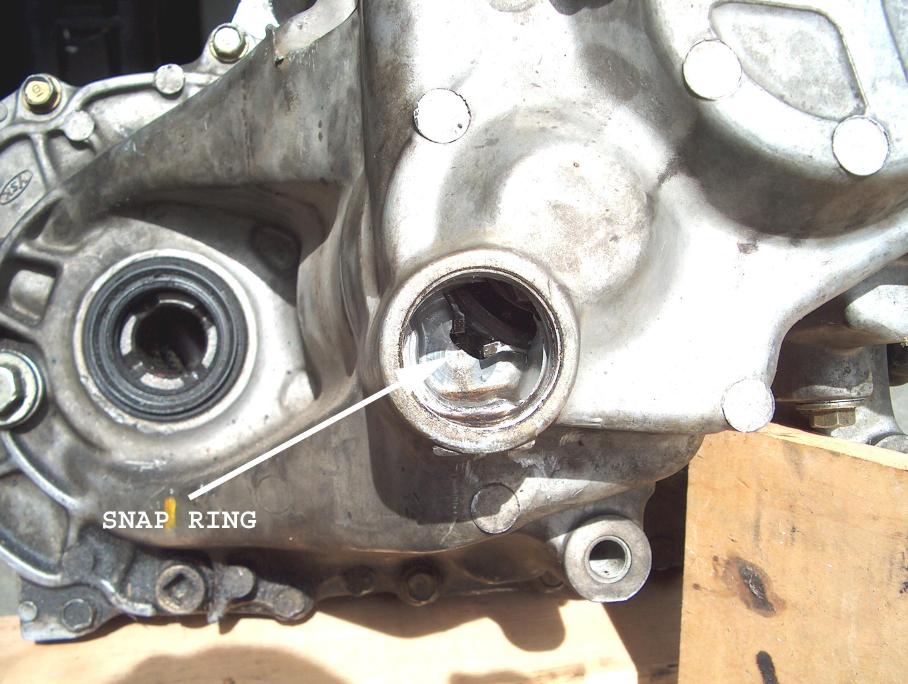
Use the snap ring pliers you got from Sears to spread the snap ring shown in the photo above. When you do this, you should hear the intermediate shaft drop a slight amount. This snap ring will pretty much stay in place once the two cases come apart, so you don't have to worry about it falling into the trans.
At this point, you should be able to gently pry the two sides of the transmission apart! You do have to make sure that it comes apart straight. If the snap ring didn't release before, you may have to use the pliers while prying the transmission apart.
You don't have to beat on anything! If you are tempted, then walk away and come back latter!
If there were monsters inside the transmission, now is when they would jump out and get you!
What's inside?
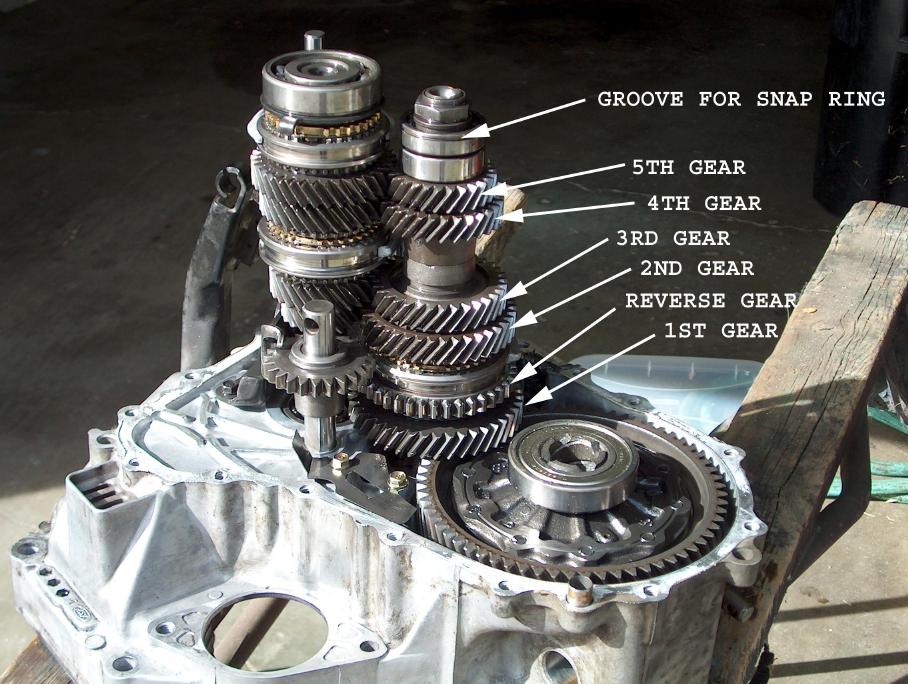
Well, here are two photos showing what's inside, and once again, they are "click-able" to view a larger version.
In the photo on the left, the arrow #1 is pointing to a detent ball cover bolt. You don't have to remove it.
Don't let the "linkage" complexity scare you. It unbolts as an assembly and comes out. I do have to say that if I didn't have the factory manual, putting it back together would have put me over the top!!!

The photo on the left shows the "reverse" idler gear. The arrow #1 is pointing to the shaft hole that receives the bolt that you removed from outside the case. The shaft is indexed and as a result, the hole lines up correctly when you put the two cases back together.
In the photo on the right, arrow #1 points to one of the "syncros". They are normally made out of brass and that's why they have a gold like color.
Arrow #2 points to the grooves that the detent balls go into.
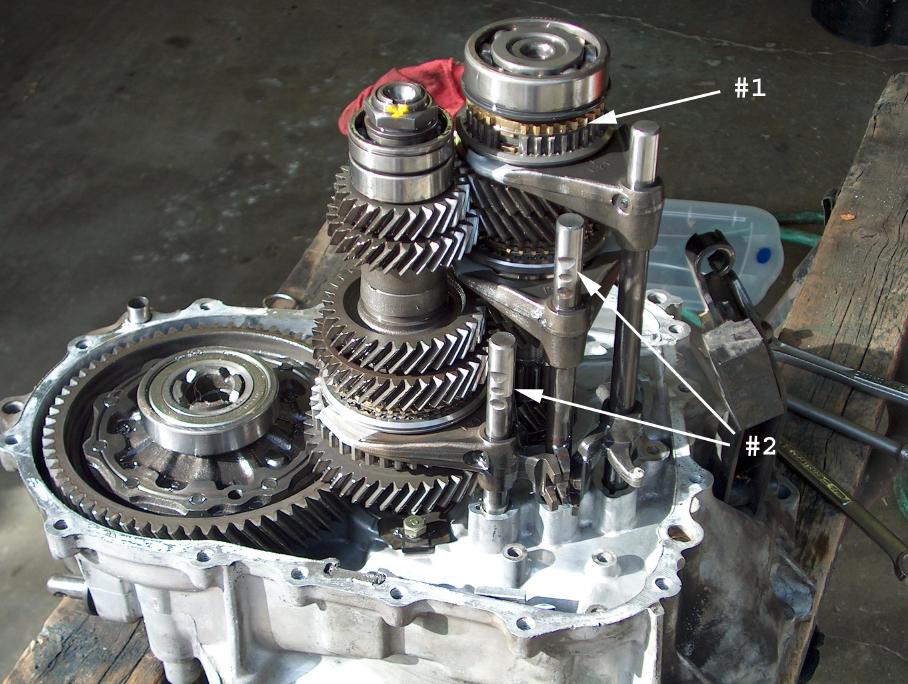
After un-bolting the shift linkage and setting it to the side, you can remove the shift forks.
Then you can remove the gear shafts by just pulling them up and out of the case (as an assembly).
The "ugly" I found in my transmission
I found two problems with the used transmission that I bought. Both of the problems wouldn't have prevented me from putting it in the car and driving it. They would have however, at a latter date, caused major damage.
One item was that there was a crack in the main case. It didn't look all that notable from the outside, but from within, you could feel and see it. I think that it would have leaked fluid. I replaced it (the guy I bought the transmission from gave me another case).
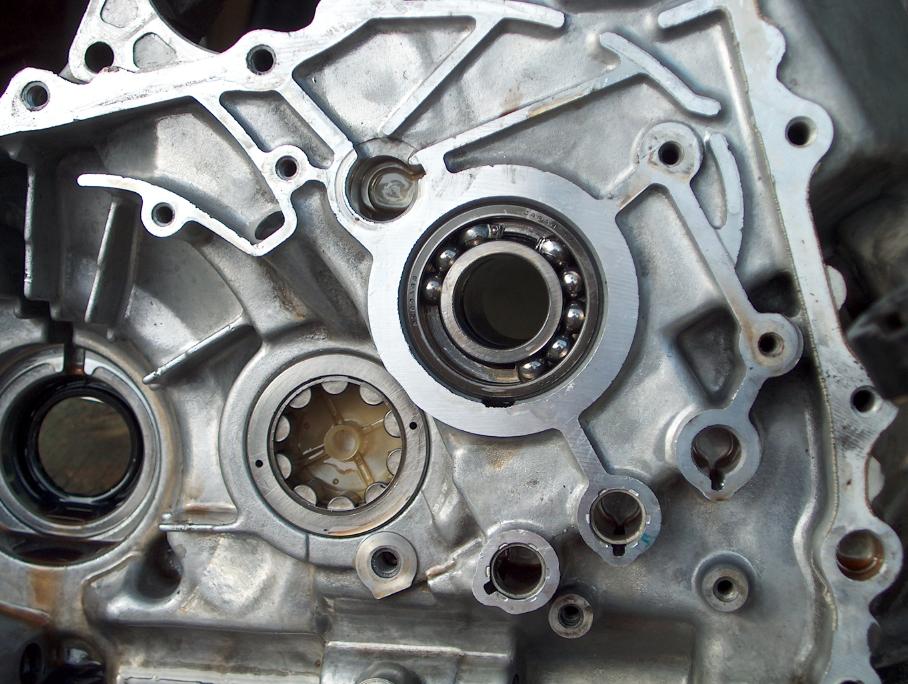
This photo shows the input shaft bearing (along with the intermediate shaft bearing). All those balls should be evenly spaced!!! The metal spacer that should keep them apart had disintegrated and pieces of it could be found on the magnet that is at the bottom of the case. As I understand it, it's common for this bearing to go south.
On the other side of the bearing is the input shaft seal. I replaced both. This has to be done from within the transmission while it's apart.
The input shaft had a small amount of scoring and so I replace it also.
That pretty much does it!
Putting it back together is just the opposite as taking it apart.
When I went to put the case back together, I had to re-position the snap ring. It should be centered in order to "pop" back in place. I also had to "jiggle" the two cases a fair amount to get them back together.
I didn't have to hit anything with a hammer!
Closing comments;
You have to think "clean"!!!
I cleaned the case with spray carb cleaner, simple green, bristle brush and water. It take a fair amount of time, but works well.
When putting stuff away for the night, cover everything with a plastic trash can bag.
When working on the gear shaft assemblies, I bought some aluminum pans like what you would use to cook a turkey. They are real cheap at Ralph's and when done you can just throw them away. It also keeps stuff from rolling away.
The bolts that hold the ring gear on the differential are "reverse" threads!
Although I decided to re-use the differential bearings, it's up to you to judge if they have gotten damaged when removed from the original differential.
Buy new seals! There are the two axle seals and also the input shaft seal. Don't even think about it, just buy new seals.
Buy new lock tabs. I didn't totally disassemble the gear shaft assemblies, so it didn't apply to me.
Once you are done putting it back together, tape up any holes! What I'm talking about is the axle holes and also the hole where the speedometer cable hooks up (I don't currently have the fitting that goes there). If you don't do this, there is a chance that junk can get into your freshly rebuilt trans. Remove the tape only when you are ready to install the axles.
return to my site's entry page
Wes Vann